How-To: make third party classes injectable in three steps

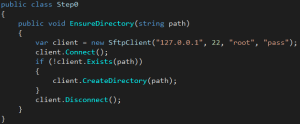
As you all know the key to make a class testable is to make all its dependencies replaceable with test doubles. This is usually done by using Dependency Injection and implementing interfaces. However, from time to time you have dependencies on third party code that you cannot change and that might not implement an interface. In that case you cannot replace it with a test double and you end up with untestable code, which is bad. I came across such code last week and want to show you how you can turn most third party dependencies injectable and create code that can be tested. The code I found looked something like this.

Figure 1: Legacy Code

Figure 1: Legacy Code

Its purpose is very simple; it should make sure a certain directory exists on an ftp server. To test this code I always need to setup the ftp server and create some defined directories and run the code against this ftp server, because I am not able to replace the SftpClient with a mock, which returns what I want without actually calling the server.

Step 1: Dependency Injection

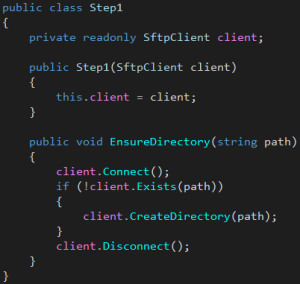
The first thing you need to do to get rid of the dependency is to inject it and store it in an instance variable. This is not only the first step to make the code testable but it additionally allows you to specify where the server is located and where the credentials come from, since you inject the whole client. The result of this step looks like this.

Step1

Figure 2: Dependency Injectiob

Step 2: Derive from dependency and create your own interface

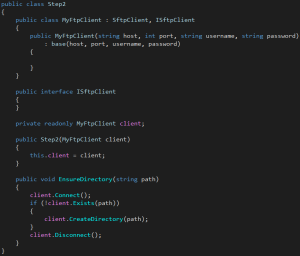
The next step is to create your own class that does nothing more than derive from your dependency, implements an empty interface and overrides your dependencies constructors. Now you have a class, that has the same capabilities as your dependency because of the inheritance, but it implements an interface and is there for replaceable. The original client had five constructors, but I just implemented the one that I was using, which is usually enough. To check that everything still works you can replace your dependency in your code with the newly created implementation, recompile and manually test your application (or run your integration / system tests if you have them). The result looks like this.

Step2

Figure 3: Derive from your Dependency

Step 3: Define the interface

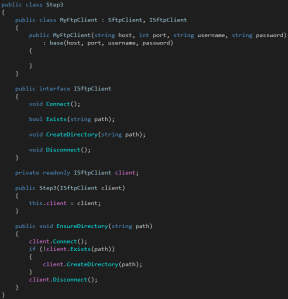
The last step is to replace the dependency in your code with the newly created empty interface. Your compiler or IDE will now tell you which methods are missing and you can create those method signatures in your interface. Since those signatures will match your original dependency and your custom class derives from it, you don’t even need to write a single line of code in your custom class to make it compile again. With the interface in place you are now ready to create test doubles based on that interface, inject into your code and create a rich suite of tests ;-). The final result looks like this.

Step3

Figure 4: Define the interface

Conclusion

With those three little steps you can make almost every dependency replaceable. It is very save to do this, since you don’t need to implement anything by yourself. You just call the base constructor and create method signatures. If you have a clever IDE such as Visual Studio or / and are using productivity tools like the ReSharper most of this code will be generated and you barely type anything by hand.

Unfortunately there are some scenarios where this approach does not work and where more manual work is needed to create testable code. If the dependency class is sealed and you can’t derive from it, this solution does not work. In this case you might need to write a wrapper class around it, which might require some additional work and is therefore prone to bugs. The second scenario that I encountered is that some of the returned classed don’t had a public constructor. In that case there is not much you can do, to make this approach to work. At the moment I don’t have a solution for this scenario. If you found one, please let me know.

I did not come across more problems with this approach and I currently can’t imagine any more issues that might break this approach. I hope you can use this to make more of your code testable and create clean bug free software. Thank you for reading and see you next time.
Setting up the Karma Testrunner on Windows

To use Karma you need to have Node JS installed on your machine. If you have not installed it grab it from here http://nodejs.org/ and install it. Make sure you chose to install the command line interface (CLI) or to register the path variable so you can run Node Package Manager (npm) commands using the windows command prompt.

If you are working behind a proxy server like I do in my company you have to configure the proxy for Node JS so that you can download packages via the console. To do so, type in the following command in a command prompt:

npm config set https-proxy http://user:password@proxy.com

Don’t get confused by the https in the configuration attribute. This does not mean that you configure a proxy that uses https, but that you tell Node to use this proxy when it tries to establish a https connection with the internet, what it will do whenever you download a node package from the node package library. The credentials will be saved as plain text in the node configuration file, so make sure you keep it in a save place 😉

After all that is done you can download the karma package using npm again. Just type the following command into the command prompt:

npm install –g karma

This will install the Karma Testrunner and all its dependencies globally (that’s what –g does). With Karma globally installed you can run karma from every location on your machine. If you forget the –g npm will install Karma at the current location of your command prompt. Karma itself does not provide you with a JavaScript-Engine; it will just execute your tests and observes files. You will later in your test configuration specify which browser you would like to use as an execution environment. To tell Karma where the executable of that browser is located you need to create a special environment variable for each of the browser you would like to use. The variable name should be the browser name plus _BIN and the value of the variable should be the full path the executable including the executable itself, for example:

  • CHROME_BIN
  • C:\Program Files (x86)\chrome\chrome.exe

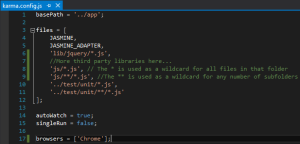
If all this is set up you just need a karma configuration file that tells Karma where to find your source code, if it should observe the files or just run once, which test framework it should use and so on. You can find a full list of the configuration on Karma’s Github page. A basic configuration file, that I use for development in most of my projects looks like this:

karma-config-js

Karma configuration file. Click to enlarge

The base URL will tell Karma what the root of your project is. All relative paths inside the configuration will be based on this URL. The files array starts with two constants defined in karma itself telling it to use the jasmine framework for test execution and a jasmine adapter to display the test results in the command prompt. After those two constants there is a list of all JS files that Karma should observe and load before executing the tests. Make sure you specify those files in the right order, for example: specify jQuery before its plugins. The usual order is: third-party libraries, application code, test code.

With this configuration file in place you can open a command prompt and start karma using the following command

karma path/to/karma.config.js

Karma will then start all the browser you configured in the config.js file, read in all specified JS files, locate all tests within those files and execute them. The results will be printed in the console window. After the execution Karma will start observing your JS files for changes and run all your tests again. You can now start developing your code and don’t need to do anything to run your tests. You can just focus on writing your code and your tests and don’t need to bother executing them.

Happy coding and see you next time.

What’s this all about

Three month ago I switched over to the Web & Mobile Team to start developing HTML5 Web Apps. Since all the tools and languages, especially Javascript, were pretty new to me, I started to look through tons of tutorials, read pages of API documentations and after weeks of learning we started to develop our first App.

The amount of features implemented grew rapidly and our code base got bigger and more complicated every single day. After two month of development we had a working app and everyone was satisfied with how the app looked. But there was one thing that bothered all developers in our team: Code Quality.

We tried to structure our code as good as possible but stumbled over several issues that where caused, because we tried to code Javascript in the same way we coded C#. In addition to that it was very hard to refactor the code, because we had no tests to tell us, that everything is still working. We tried to create tests, but found out, that our code is hard or sometimes even impossible to test in an automated way.

During my research accross the web I saw, that the amount of sources regarding Clean Code & Unit Testing in Javascript was very small. Because of that I decided to start this Blog and share my experiences I made and I will make during my new carrer as a “Web Developer”. I will tell you something about the frameworks I use to create tests and structured, maintainable Javascript code. I will share the practices that worked and will warn you about approaches that did not work and why they did not work. I hope to create some kind of knowledge base for all the Javascript and Web Developers out there that want to create “Clean Coded Web Applications”.

I know that there are lots of experienced and enthusiastic Web Developers out there and I highly appreciate your contribution to this blog. Feel free to comment, share or give any other kind of feedback and let me know what you think about this blog. Of course I like to know if you like what I do but I also want to know if I can make something better and please let me know if I did some major mistakes in the code examples.

Happy coding and see yo next time.